
The Venturii Vacuum Cleaner
Several months ago, my wife phoned me during the day saying that the (built-in) vacuum cleaner would not shut off. Even with the hose unplugged from the wall, the motor in the basement continued to run. It was the Friday before a long weekend, and my wife loves a Several months ago, my wife phoned me during the day saying that the (built-in) vacuum cleaner would not shut off. Even with the hose unplugged from the wall, the motor in the basement continued to run. It was the Friday before a long weekend, and my wife loves a clean house. When I got home I inspected the unit and found the motor relay showed signs of temperature-induced housing failure, likely the result of significant heating of the contacts. A little Googling revealed that this was a common problem for this make and model of vacuum cleaner, and a new control board would cost about $130. Relay on DigiKey: $3.60. Opportunity to work on a wife-endorsed project ALL LONG WEEKEND: Priceless.
First of all I needed a hefty relay. The one that failed was a 30 Amp 24VDC relay. I found one similar to this in my relay bin, a 30 AMP, 24VDC coil N/O bigg’un. Now I could have simply soldered some lead wires over to the control board, the rest of which was perfectly healthy, and been done with it, but I wanted to work a little bit more magic into an otherwise mundane appliance. Enter Arduino.
I’d built several projects on the Mega series of Arduino boards, but a full Mega seemed like swatting a fly with a bulldozer in this case, and I had both a Nano and a Pro Mini laying around. Truth being told, I spent more time struggling with the Nano only to find out that there was something wrong with the board. (My Nano = DX Chinese Knockoff.) It would not program, either through USB or ISP, but I had never worked with a Nano before (or any 328 for that matter) so I wasn’t 100% sure I was *doing it right.* Eventually I gave up and moved over to the Pro Mini, which – after troubleshooting an issue with the 5v pins not being internally connected to each other while I assumed they were, it programmed right up. With a working microcontroller up and running, the rest was pretty straight forward. I added a little 2×16 LCD screen I’d bought on DX because it was too good a deal to pass up. I put together a little breadboard and soldered some jumpers. The relay control itself was a first for me, being that it was a 24v DC powered coil. Spec sheet said it needed something like 65mA holding current but inrush could be over 110mA. As well, I had not worked with 24v before, switched with silicon; I suspected that smoke could be in my near future.
I started looking at other circuit boards with relays and checking out the drivers they used to switch the power to their relays. The one I ended up utilizing was a 2 channel high current driver that I pulled from a broken access control board (a first generation Mercury MR-12 or Lenel LNL-1320 to be specific.) According to the spec sheet, it was more than capable of handling the required current to run this relay. This should solve the problem of motor control. Now what should I have the LCD screen say? Originally I had a very practical screen that simply stated that the motor was idle when in fact it was, and then claimed the motor was running as the case may be. However, this information would certainly not be new to anyone standing close enough to the unit to read the words on a tiny LCD screen. By creating different inputs for each vacuum “hole” in the house, and separating the wires that originated at each, I could now have it display *which* hole was calling for vacuum, and therefore *where* the dust it was collecting was coming from. Finally, because I love to integrate things, I embedded some code from my existing Venturii platform so that it could report the status of all the inptus, allow remote control of the motor and also allow remote control of the LCD screen through Venturii. The Venturii Vacuum Cleaner was born.
Once this was all set up, I decided to put witty sayings on the LCD screen when the motor was idle. This was harder than it sounds since you have to try to come up with things a vacuum cleaner might say like “I Love Dust Bunnies” or “Being A Vacuum Cleaner Sucks.” Every day my older two girls would check the vacuum cleaner, and then ask me when I got home why I hadn’t updated it yet. They got quite a kick out of it, but unfortunately my creativity dried up after about 4 or 5 vacuum cleaner sayings. None the less, it still works and best of all – my wife is happy I keep the floor so clean. clean house. When I got home I inspected the unit and found the motor relay showed signs of temperature-induced housing failure, likely the result of significant heating of the contacts. A little Googling revealed that this was a common problem for this make and model of vacuum cleaner, and a new control board would cost about $130. Relay on DigiKey: $3.60. Opportunity to work on a wife-endorsed project ALL LONG WEEKEND: Priceless.
First of all I needed a hefty relay. The one that failed was a 30 Amp 24VDC relay. I found one similar to this in my relay bin, a 30 AMP, 24VDC coil N/O bigg’un. Now I could have simply soldered some lead wires over to the control board, the rest of which was perfectly healthy, and been done with it, but I wanted to work a little bit more magic into an otherwise mundane appliance. Enter Arduino.
I’d built several projects on the Mega series of Arduino boards, but a full Mega seemed like swatting a fly with a bulldozer in this case, and I had both a Nano and a Pro Mini laying around. Truth being told, I spent more time struggling with the Nano only to find out that there was something wrong with the board. (My Nano = DX Chinese Knockoff.) It would not program, either through USB or ISP, but I had never worked with a Nano before (or any 328 for that matter) so I wasn’t 100% sure I was *doing it right.* Eventually I gave up and moved over to the Pro Mini, which – after troubleshooting an issue with the 5v pins not being internally connected to each other while I assumed they were, it programmed right up. With a working microcontroller up and running, the rest was pretty straight forward. I added a little 2×16 LCD screen I’d bought on DX because it was too good a deal to pass up. I put together a little breadboard and soldered some jumpers. The relay control itself was a first for me, being that it was a 24v DC powered coil. Spec sheet said it needed something like 65mA holding current but inrush could be over 110mA. As well, I had not worked with 24v before, switched with silicon; I suspected that smoke could be in my near future.
I started looking at other circuit boards with relays and checking out the drivers they used to switch the power to their relays. The one I ended up utilizing was a 2 channel high current driver that I pulled from a broken access control board (a first generation Mercury MR-12 or Lenel LNL-1320 to be specific.) According to the spec sheet, it was more than capable of handling the required current to run this relay. This should solve the problem of motor control. Now what should I have the LCD screen say? Originally I had a very practical screen that simply stated that the motor was idle when in fact it was, and then claimed the motor was running as the case may be. However, this information would certainly not be new to anyone standing close enough to the unit to read the words on a tiny LCD screen. By creating different inputs for each vacuum “hole” in the house, and separating the wires that originated at each, I could now have it display *which* hole was calling for vacuum, and therefore *where* the dust it was collecting was coming from. Finally, because I love to integrate things, I embedded some code from my existing Venturii platform so that it could report the status of all the inptus, allow remote control of the motor and also allow remote control of the LCD screen through Venturii. The Venturii Vacuum Cleaner was born.
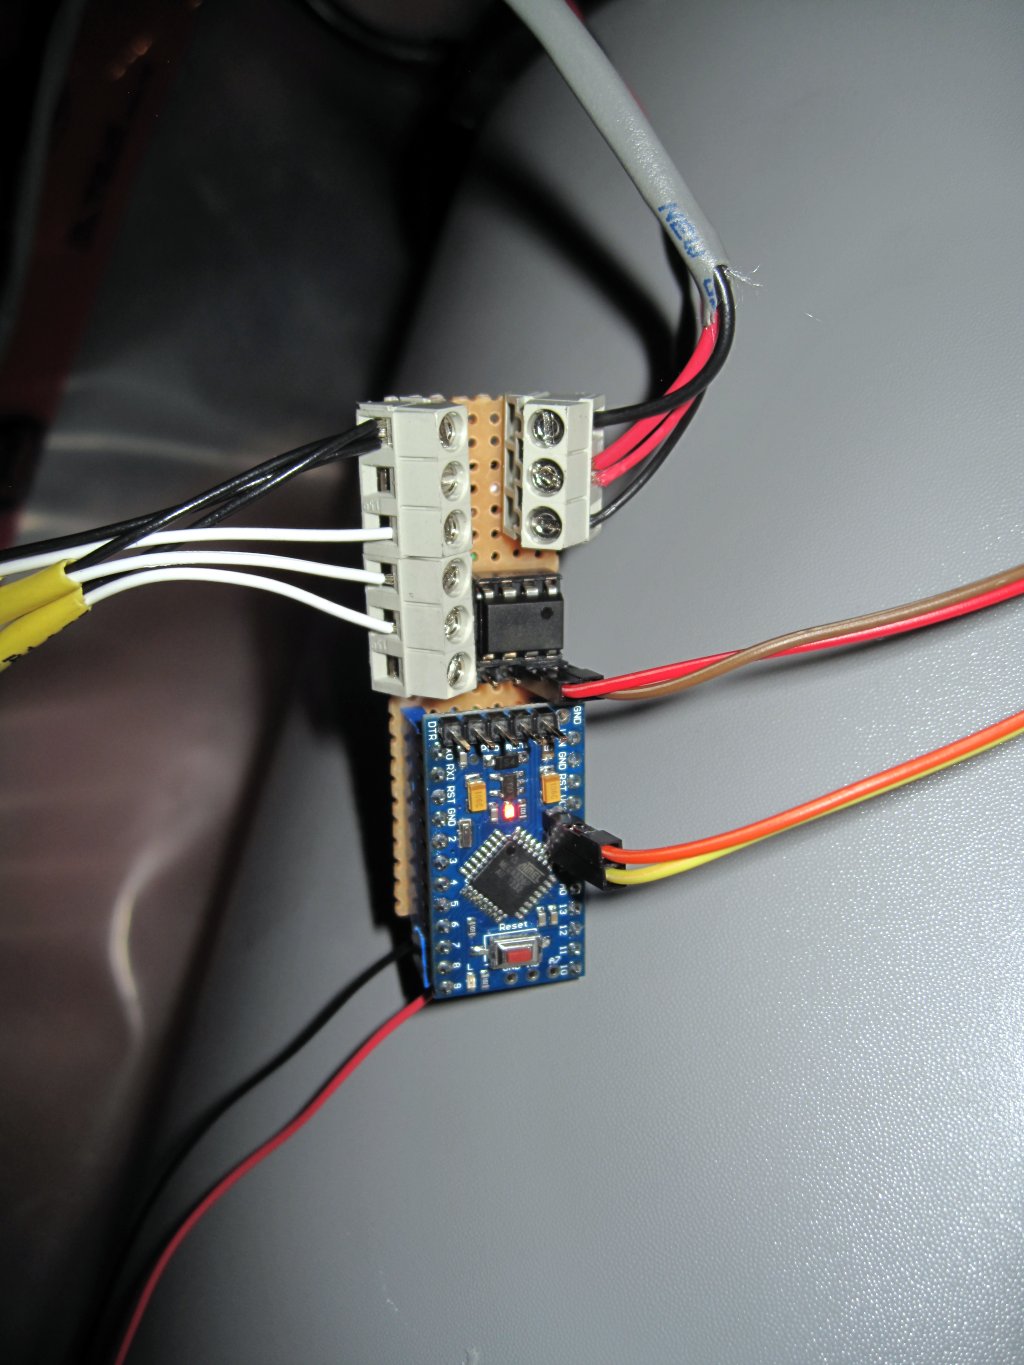
Venturii Vacuum Cleaner Controller
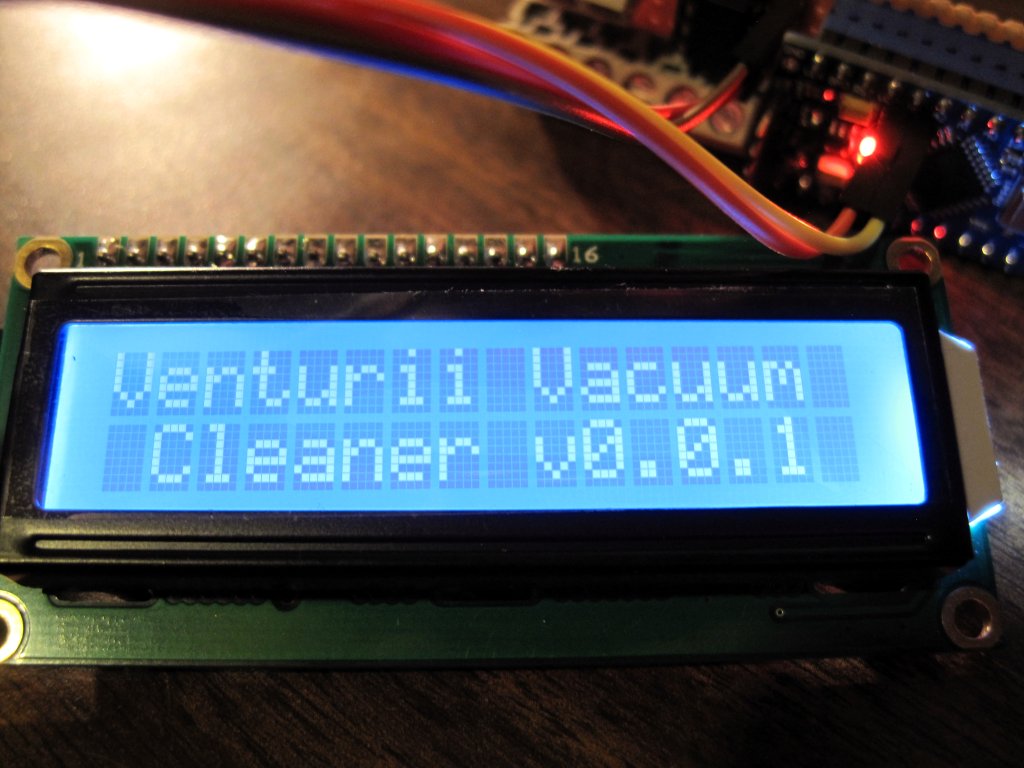
The Venturii Vacuum Cleaner LCD Display
Once this was all set up, I decided to put witty sayings on the LCD screen when the motor was idle. This was harder than it sounds since you have to try to come up with things a vacuum cleaner might say like “I Love Dust Bunnies” or “Being A Vacuum Cleaner Sucks.” Every day my older two girls would check the vacuum cleaner, and then ask me when I got home why I hadn’t updated it yet. They got quite a kick out of it, but unfortunately my creativity dried up after about 4 or 5 vacuum cleaner sayings. None the less, it still works and best of all – my wife is happy I keep the floor so clean.