Rain Water Reclamation System
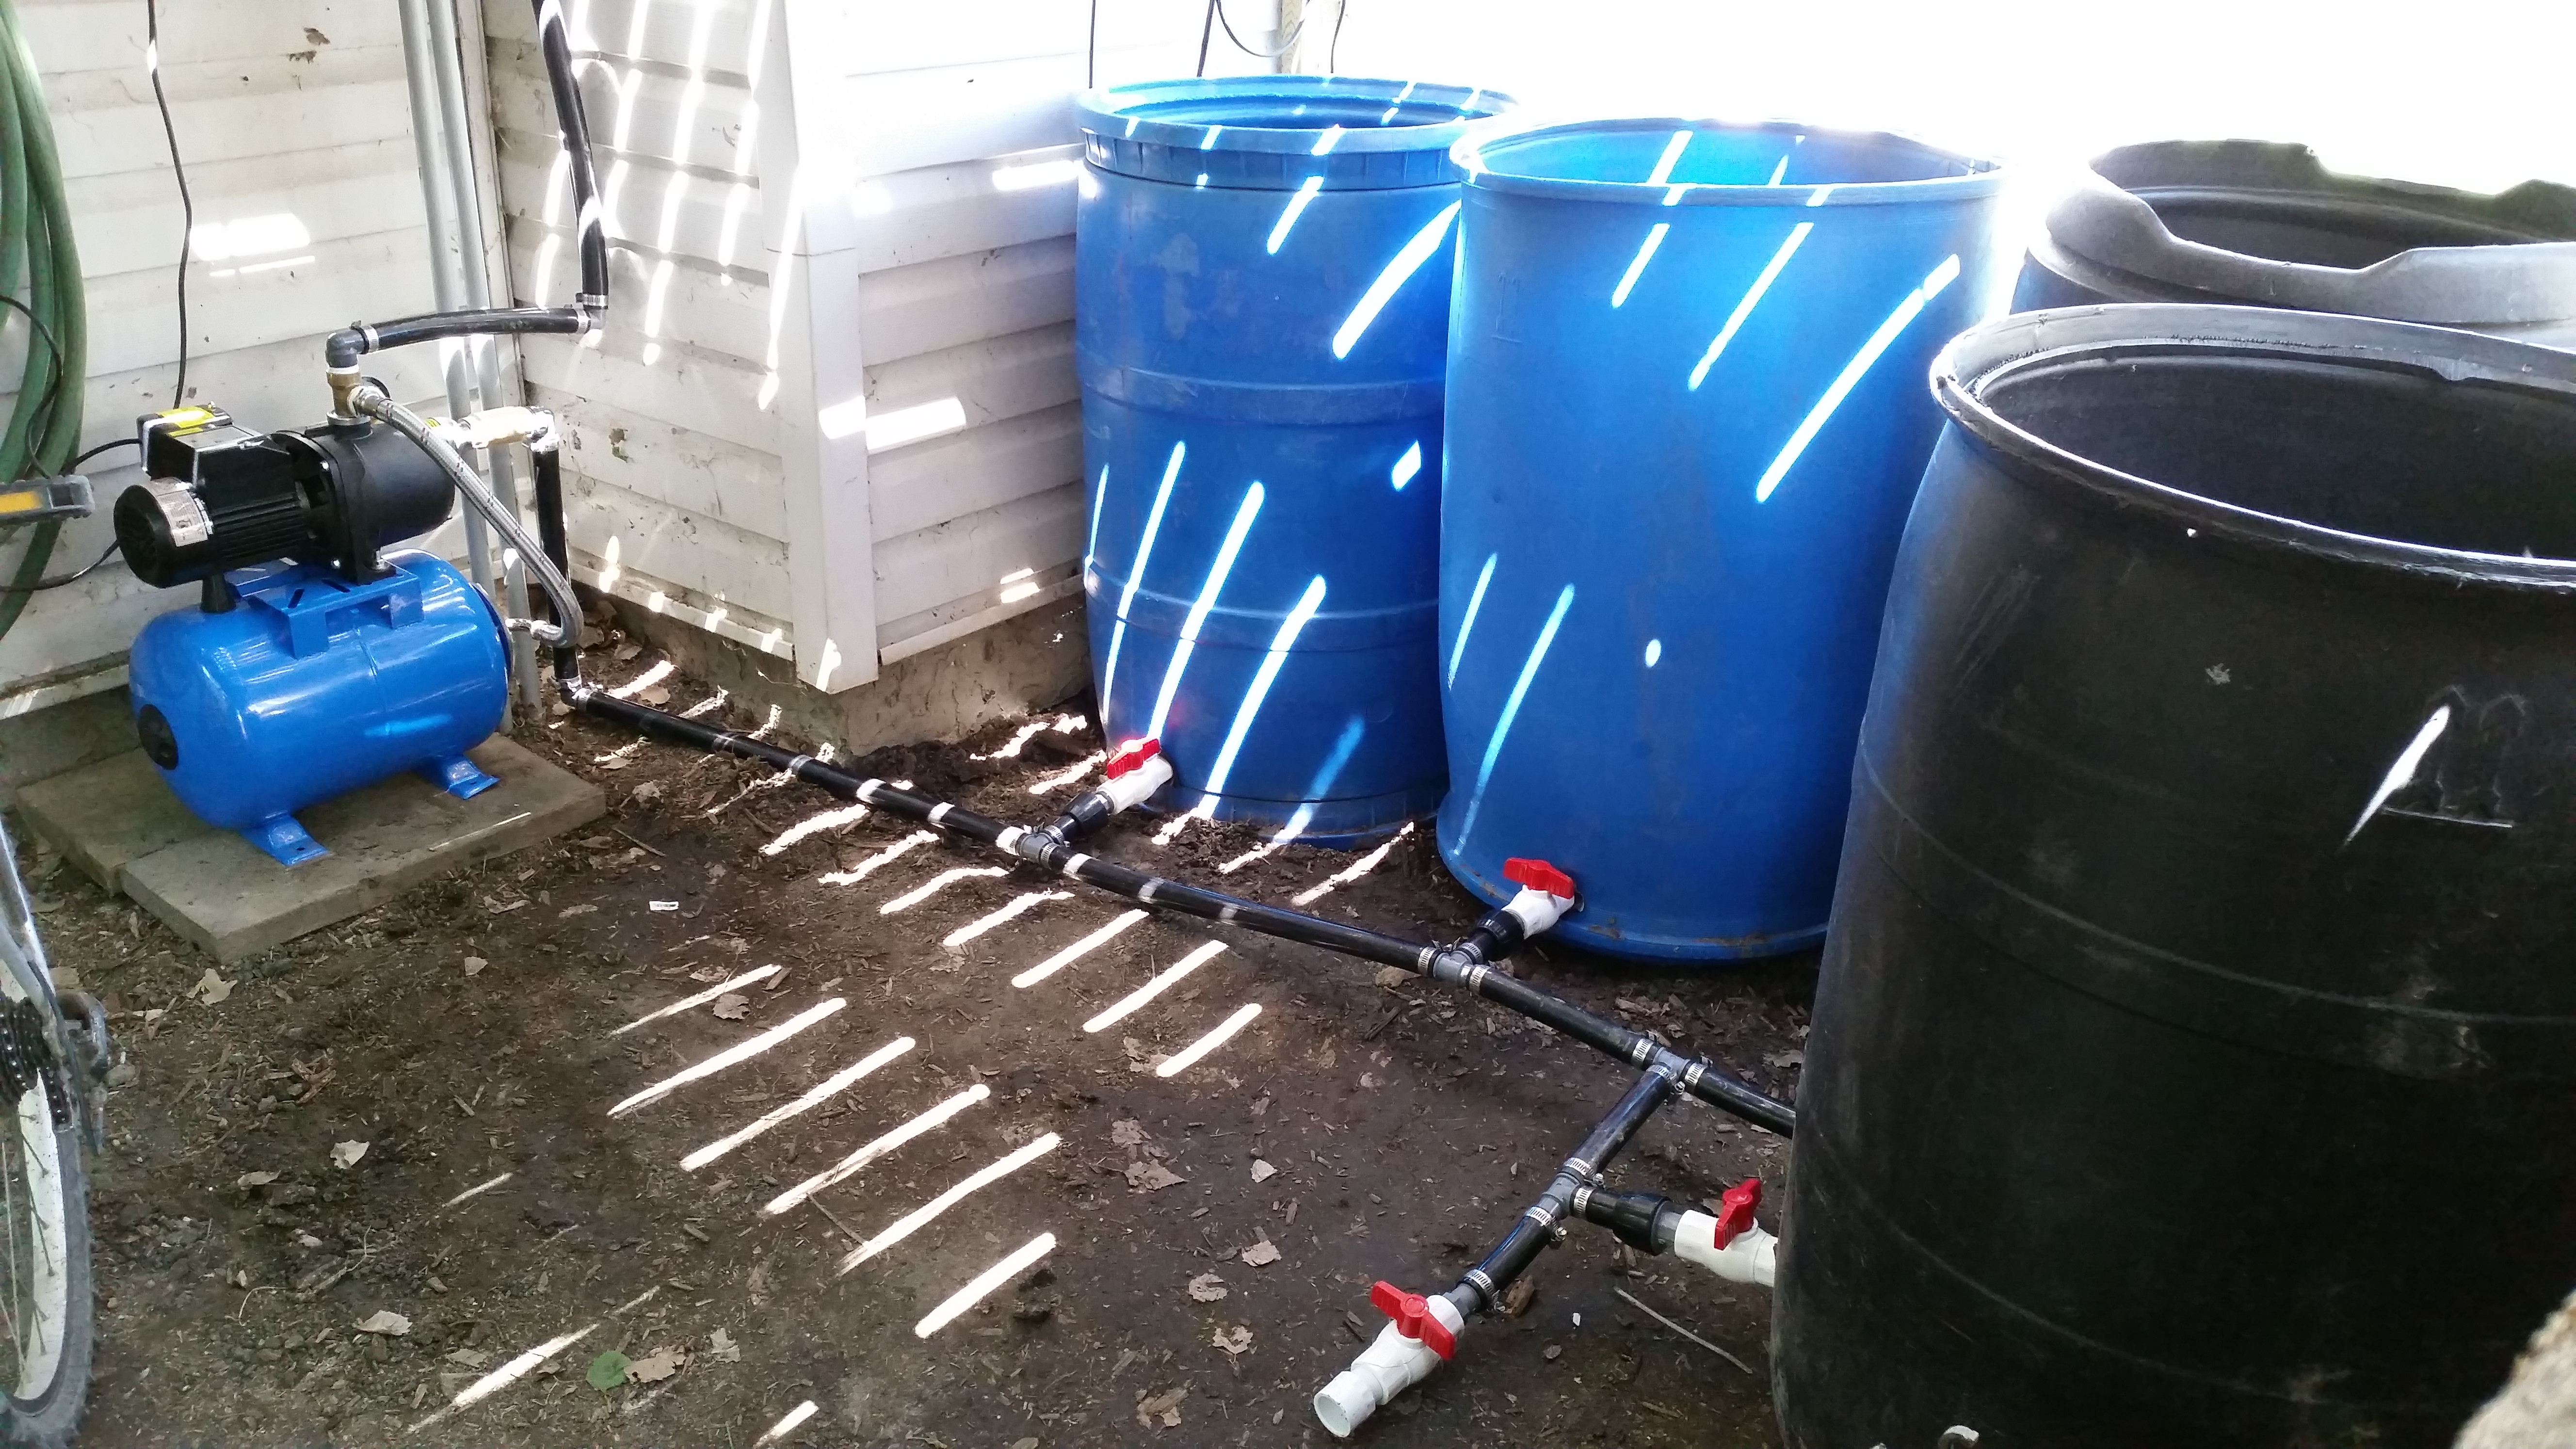
I’ve spent the last few evenings and the better part of yesterday (Saturday) putting together the pieces of this Rain Water Reclamation system. The idea is simple enough – collect rain water into barrels when it rains, and then pump that water into the sprinklers when needed to water the grass, trees, flowers and shrubs.
Challenge number one – Connecting the barrels together.
Originally I was thinking about putting a spigot in the center bottom of each barrel, thinking that this would allow the most water to be pulled from each container. After carefully considering a number of designs for stands and bases for the barrels to sit on such that they would be able to accommodate a bottom-based spigot, I opted against this in favor of simply putting one on the side (as much as barrels have sides, per se) and would just have to live with the loss of an inch or two of water in the bottom. As an added bonus, this would also provide a cleaner pickup and prevent larger debris from the bottom of the barrel from being sucked into the pump.
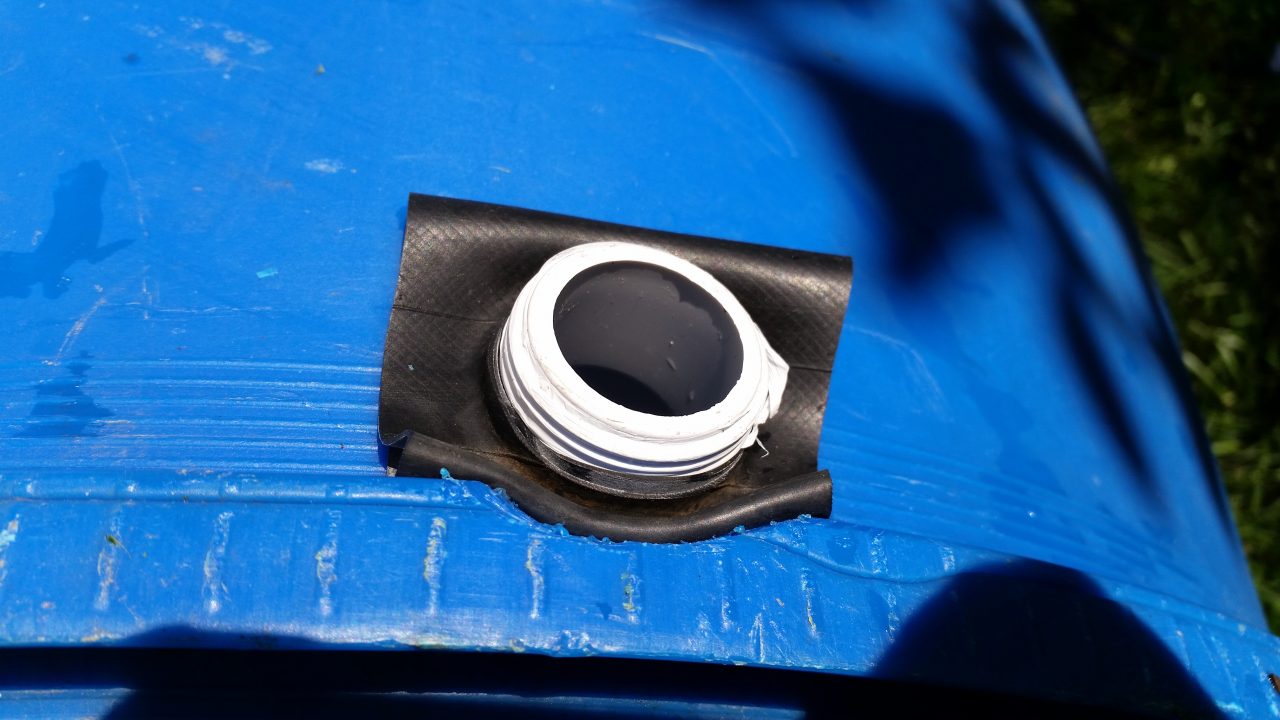
Drilling a 1″ hole with a Rigid hole saw proved a very effective way to penetrate the barrel. By threading a Schedule 40 PVC Slip to Male Thread adapter outward from the inside of the barrel, this provided threads onto which one could mount a 1″ PVC ball valve. I created a rubber gasket for the inside and outside of the barrel using a section of bicycle tubing with a round hole cut into the middle. This provided an extra seal between the barrel wall and the penetrating parts so that silicone was not necessary. On the other side of the valve I threaded in a 1″ male thread to poly Turnseal connector. Originally I had a clamp based adapter of the same type but found that it was nearly impossible to separate the insert from the poly pipe since the barrel and pipe were both virtually non-moveable, and I was worried that if I started to really pull on the pipe it might give way suddenly and cause me to break other connectors, spigots, etc.The turnseal connectors, by contrast, are easily loosened by hand and the poly then slips nearly effortlessly off the fitting. I had to make a special trip to Regency Irrigation as Home Depot no longer carries the Turnseal line of products.
Placing a valve on each barrel was part of the plan from the beginning. I wanted to be able to isolate individual barrels from one another, which proved a good idea for a number of reasons:
- Managing the valves provides that water can be sourced to the pump from specific barrels only.
- If a barrel needed to be removed from the plumbing, it could be disconnected fairly easily.
- Water from one barrel can be transferred to another barrel up to 50% of their capacity by simply opening the valves of both barrels and closing all the others.
Being able to maximize the collection of rain water will be key to making the system effective. I doubt the aesthetics committee will permit me to install a barrel at every downspout, (We have two on each of the house and garage.) I get away with the one on the garage because it’s on the least visible corner. Putting barrels on the sides of the house really isn’t practical because of our specific layout, however I am now considering a 5 gallon bucket with a small submersible sump pump-style pump under the spouts with a garden hose attached to it to collect water from the bucket and push it up to the larger barrels when it rains as the bucket fills. The water could potentially be fed from one of the down spouts directly into the rain barrel farm, however this may not pass the aesthetics committee’s stringent standards. (Then again, buckets may not either…) Maybe I could set them out when there is rain in the forecast and put them away otherwise. Ideally this system would run itself though, so the less manual intervention I have to do the better.
Here’s how I attached 1″ poly pipe to each barrel.
Start by preparing some rubber gaskets to seal the spigot against the wall of the barrel. I wanted to avoid the use of silicone or other adhesives, so went with two sections of bicycle tube with a circle cut out of them.
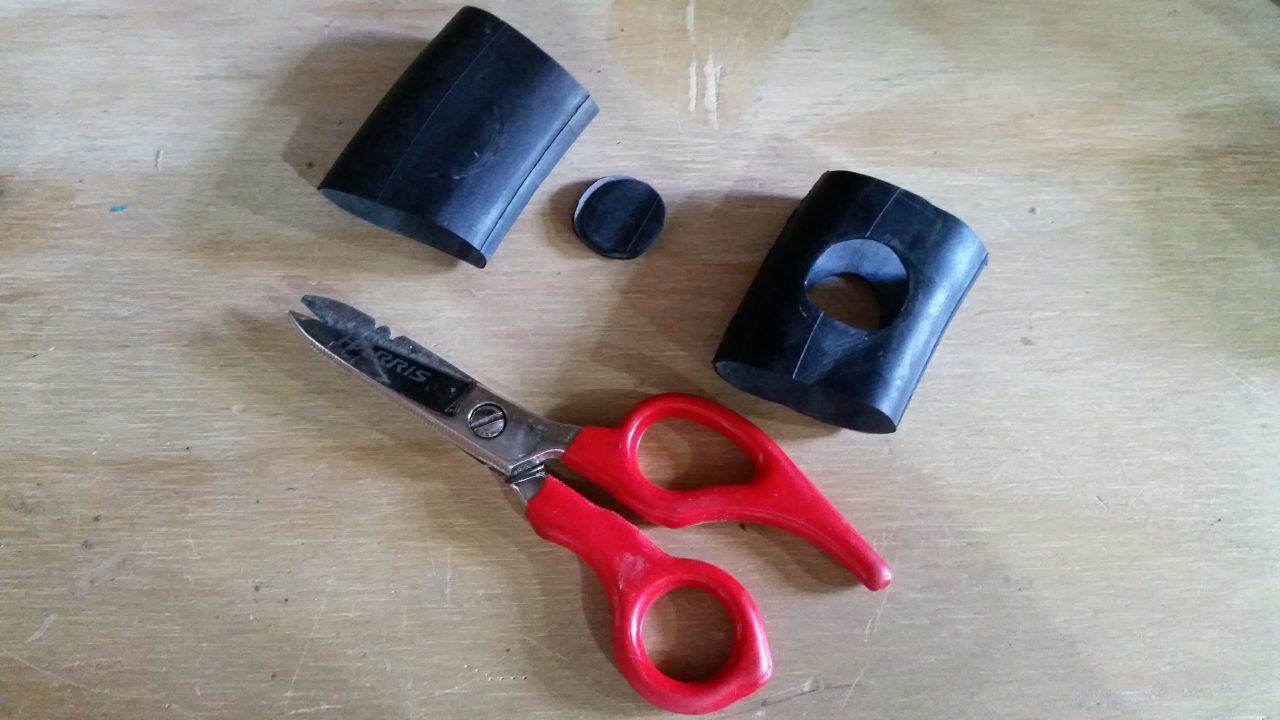
How To Make a Rain Barrel Gasket Out Of An Old Tire Tube
Place the male threads in the middle of the tire tube and turn it a 1/4 turn to make a mark on the rubber. Fold the rubber in half and use a sharp pair of scissors to cut out a half circle just slightly smaller than the outline you made in the rubber. This will create a gasket as seen on the right, above. One of these on the inside and outside of the barrel will form a water-tight seal without any mess or having to wait 24 hours for the silicone to dry / cure.
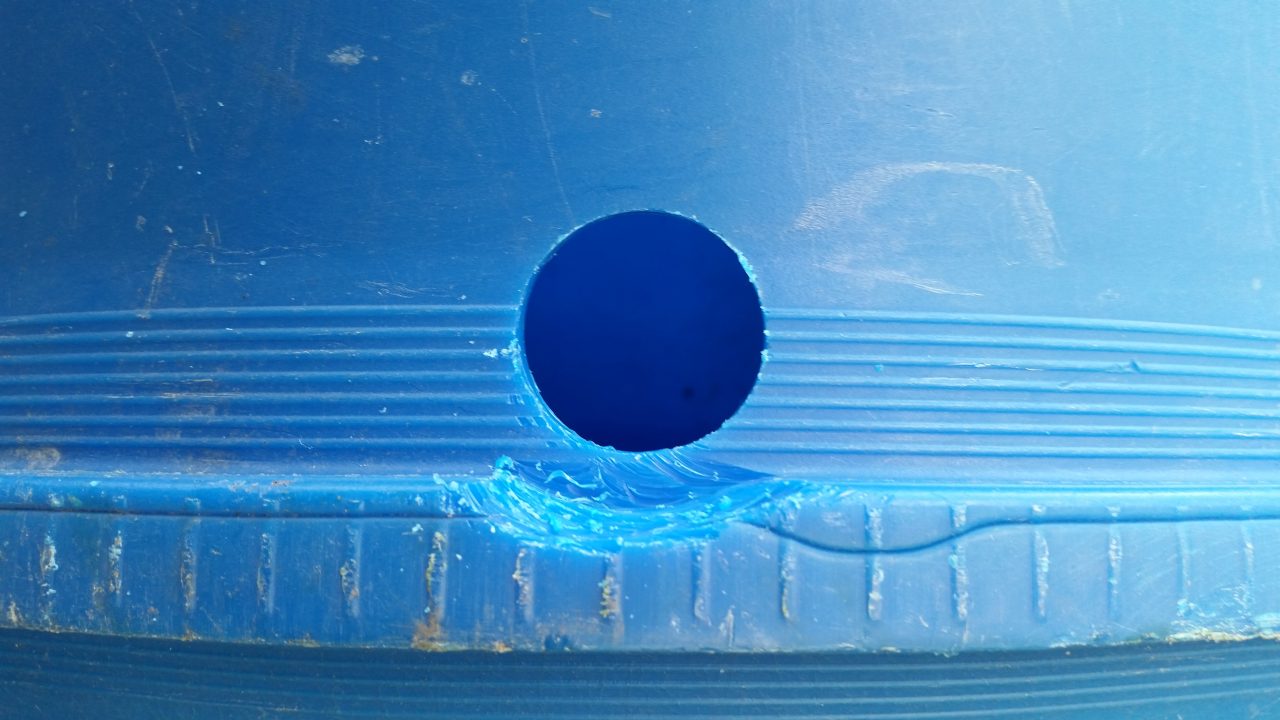
1″ Rain Barrel Spigot Hole Cut A Little Too Close To The Seam.
Step 1: Drill a 1″ hole in the side of the barrel near the bottom. You have to check the inside and the outside of the barrel to make sure there is enough clearance around the hole for your slip to threaded insert and the valve itself to both be able to snug up to the wall of the barrel. In the pictures I cut this hole a little too close to the barrel seam. The PVC valve could not thread on, so using the hole saw I notched away a bit of the seam to make room. Ideally this hole would have been 3/4″ higher, and thus this problem averted.
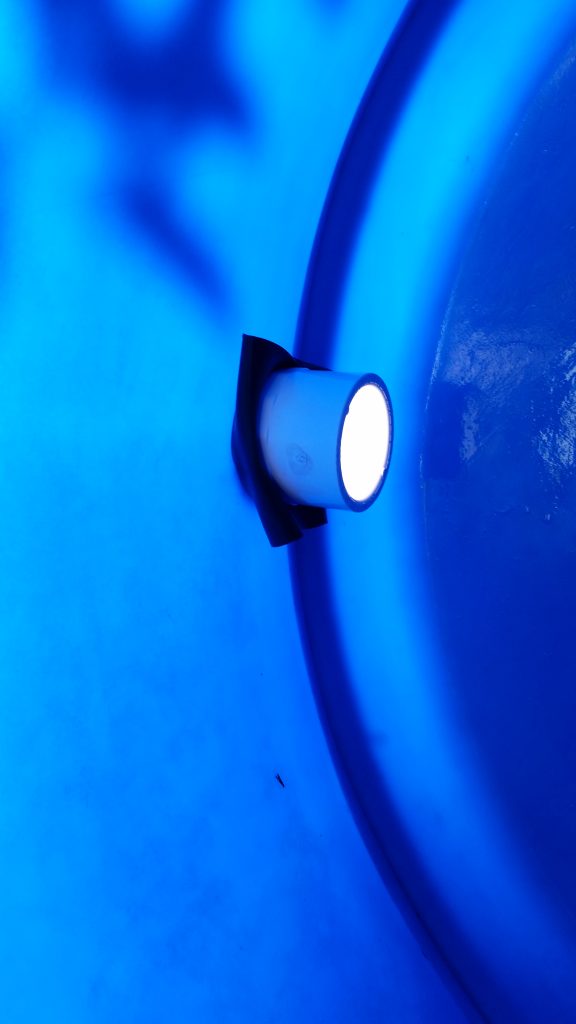
Rain Barrel Spigot made out of a 1″ PCV Slip to Male Threaded Adapter.
Step 2: Place one of the gaskets over the threads of the insert and thread it outward through the hole in the barrel. It should be just large enough to thread into the barrel wall. Tighten it hand tight.
Male Threads of Insert Seen From Outside The Barrel, Ready to Mate With a 1″ PVC Valve.
Step 3: Place the other gasket over the threads now protruding from the side of the barrel and thread on a 1″ PVC ball valve.
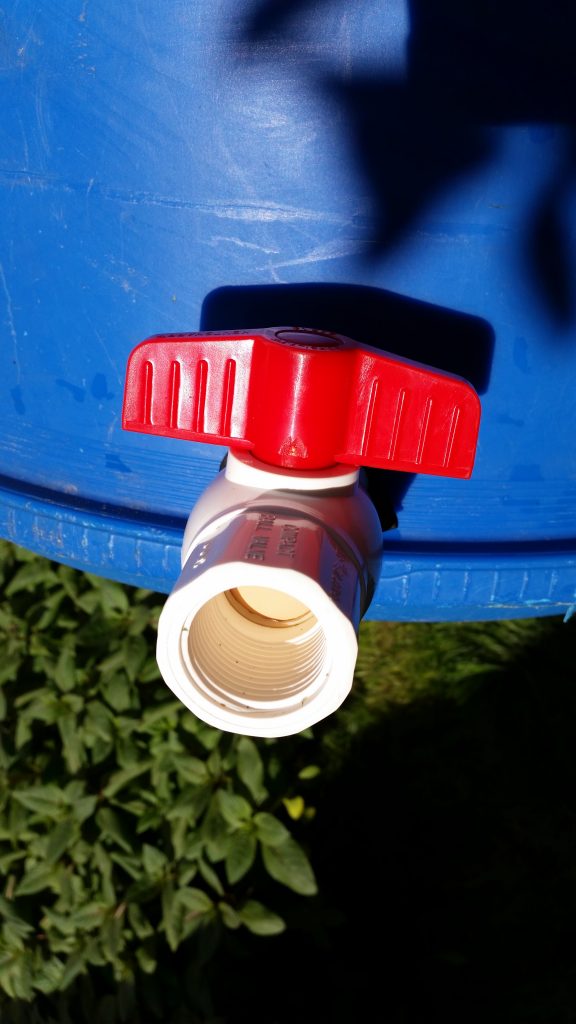
1 Inch PVC Valve Threaded Onto Slip to Threaded Male Insert, Forming A 1″ Rain Barrel Spigot
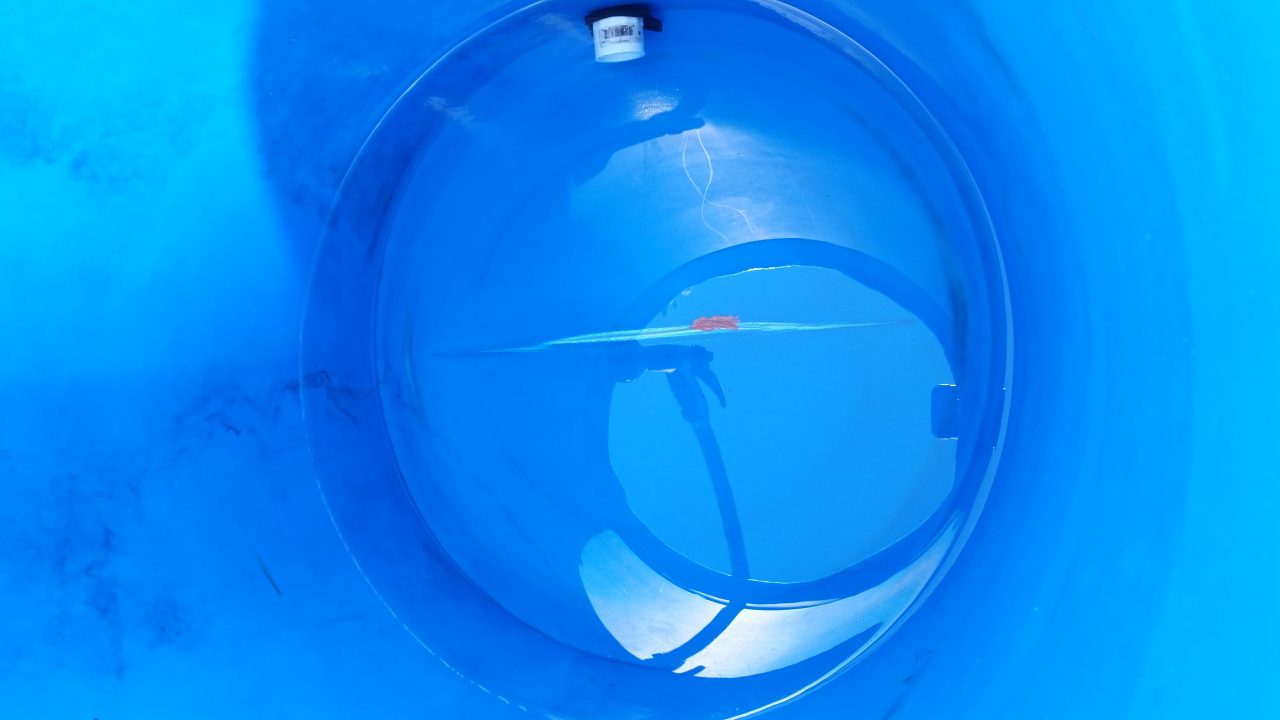
Now the barrel is ready to be water tested. You’ll want to check for leaks and/or cracks before plumbing everything into place. In my case these barrels belonged to my father, who had them since I was a wee lad. On at least one occasion it looks like some of them must have frozen with water in them, the expansion of which had stretched out a seam along the diameter of the bottom of the barrel. Climbing into the barrel with afternoon sun shining on them from outside is a great way to spot cracks and potential weak spots.

Crack Found in Rain Barrel Seam Caused By Water Freezing And Expanding In The Barrel Over Winter
From inside the barrel it is almost trivial to spot cracks, holes, and even weak spots in the plastic. This is a macro view of one such crack I spotted in the bulged seam that spanned the diameter of the bottom of this particular barrel. To seal this crack I decided to try an industrial gasket maker I’d used when repairing front-loading washing machines called Ultra Copper. After cleaning the area with small, stiff-bristled brush I applied the gasket making material like silicone, filling the cracks and smoothing it out. After 24 hours I returned to the barrel to test and found that it had no trouble holding water, at least under the initial tests. Time, of course, will tell how this substance stands up to long term use under gravitational pressure.
Water Testing a Rain Barrel After a Small Crack Was Sealed With Ultra Copper Gasket Maker
After filling the bottom sixth of the barrel with water, the seam and valve were observed for leaks. I’m happy to report that all was dry outside the barrel, and so I moved on with the rest of the installation and further challenges discovered in this project. Read on.
Challenge Number Two: Keeping The Water Clean.
I read a number of articles and writeups on the matter, and the Internet concensus on inline filtration is to put any sort of inline filter after the pump. I had considered the opposite approach, putting the filter before the pump so that it would catch any debris before it went through the impeller, but the reason given on the ‘net is that if you neglect the maintenance of the filter, the pump could starve for water and cavitate, which will ruin the pump in short order. Better to have a blocked outlet than a blocked inlet. So that’s what I did. I went to Regency Irrigation for this part also, they carry a line of Toro filters and the one I picked up is a 1″ inline filter. It has a flush plug so you can purge the filter contents without taking it apart. Simply hold a bucket under the filter, unscrew the cap and it will push collected debris out the hole in the bottom. Re-cap the line and you’re good to go. Of course the screen itself is removable and replaceable if necessary. It has a very fine mesh which should keep even my drip system free from clogging.
Challenge Number Three: Gravity.
There’s a saying I learned a long time ago about the way electricity moves through wires and circuits, “The electricity knows…” This is a reference to the way electricity finds the path of least resistance through a circuit. Water and electricity share many characteristics, including path of least resistance. However one thing that affects water but not electricity is gravity. When you have one barrel full of water, you just need it to be level so that it does not create a “deep end” and a “shallow end.” Or if you have an overflow spout, you might purposefully lean the barrel towards it so that when it becomes full the water will drain out the overflow hole / pipe / tube / spigot / spout. However, when you connect 6 barrels together, all six have to not only be level but have to be level between the six. Otherwise one barrel will overflow while the others are still not full.
It was at this point in the project that I realized just how much of a slope there is in the space under my deck where the barrels are being installed. I had to dig out some spots and fill up others. At one spot I filled the ground with decorative bricks to build up the base enough to level off the last two barrels to the rest of them. Undoubtedly over time as the barrels sit full of hundreds of pounds of water the ground will probably settle and sink a bit, meaning that as much work as it was to level everything this time around, it probably won’t be the last time I have to do this!
Challenge Number Four: Noise.
I was awakened from my sleep at NTP-Synchronized 5:00 this morning when the jet pump kicked on to start the day’s sprinkling. When it first fires up, there is a bit more noise as the pump settles into it’s routine. It sounds like there is a bit of air still in the system, but despite running hundreds of gallons through the system already it does not seem to be diminishing. The sprinkler program I had been running was time-based from last year, and only ran a few of the zones such that the pump could easily overtake the demand, recharge the pressure tank and then shut off… only to repeat this process every minute or so. After half a dozen cycles of this I rolled to my phone and opened a few more zones so that the pump would at least stay running. This prevented the cycling and once the pump remained in operation it was no more noisy than a window air conditioner. However it does suggest that I will have to build a box of some sort to help contain the noise of the pump, as the last thing I want to do with my water reclamation project is to annoy the neighbors with it!
Challenge Number Five: Water Supply
Admittedly, I jumped into this project headlong and really did not crunch any numbers beforehand. Last night to test the system out I filled three of the barrels full of city water, which we will call an approximate 135 gallons or about 510 liters. Based on some rough numbers that I threw together this morning, the pump ran for about 27 minutes before draining all three barrels and cavitating, requiring me to run outside quickly to turn it off as it has not yet been tied into a Venturii VDAC (even though there is one right above it.) Based on the amount of water that was pumped and the time it took, 135 gallons divided by 27 minutes = 5 gallons per minute. Considering that I was running about half of my irrigation system at this point, (Garage North Side, Front Lawn North and South, and House North Strip), and drawing from half the number of barrels on site, I’m roughly estimating that with all six barrels full I’d be able to run each sprinkler zone for about 30 minutes. All the in-ground sprinklers are Hunter MP Rotator series, which have a pretty consistent 10 mm / hour matched precipitation rate. Running them at half an hour each gives 5 mm of precipitation. These numbers mean that in order to water 5mm twice a week, I would have to collect 270 gallons (or 1020 liters.)
These numbers of course, aren’t exact. I’d really need to determine exactly the water flow for each zone that is watering grass and separate it from the zones watering the flower beds, shrubs, trees and hanging baskets. Typically these have been run for 1-5 minutes at a time, but two or three times a day (temperature dependent.) However this all points to the fact that although I’ve assembled six barrels of water, this may not actually go very far when it stops raining in the summer.
Challenge Number Six: Value
Is it actually worth it? Factor in the costs of the barrels, the pumps, the fittings, the pipe, the gas and time of many trips to Home Depot, the days of work to put it all together, testing, and in a few cases, fixing missteps along the way. Water from the endless city supply, clean and clear, delivered under pressure through pipes right to my house, costs $1.7698 per cubic meter plus $1.1028 for sewer since this is calculated based on water usage and does not take into account lawn watering. This also does not take into account the fixed delivery rates, but since you have to pay those regardless of usage, I am excluding them from this calculation. Using these numbers, if I were to fill all six barrels to the brim with city water it would cost $3.53. That means that whenever it rains enough to fill all six barrels from empty, this saves $3.53.
Pumps use electricity. The 1/2 HP jet pump draws 6.5 amps at 120 VAC, or 0.78 kWh. I pay a fixed electrical cost of 8.5 cents per killowatt-hour, so to run the pump for one hour costs $0.0663 or just under 7 cents / hour. Assuming the barrels are full and that I am watering one hour / week, that becomes $0.2652 or just over a quarter. Again, these prices do not include the connection, transmission, distribution, substation, power line, rate rider, balancing pool allocations or administration costs that are present on every power bill; only the actual usage costs are included in the calculations.
So let’s say use some averages and assume that I want to water my lawn once a week. First we need it to rain enough to fill all 6 barrels. That amount of rain would almost certainly supply my lawn with that week’s allotment of water, so now I only need to water three times that month. So I water on week #2, and have saved $3.26. Now the barrels are empty, and I’d need another week of rain to fill them. If we get that rain, we skip another watering cycle, and so water a second time on week #3, saving another $3.26. Barrels are again empty, but in this month we have saved about $6.62. Considering we generally water in the latter part of May, all of June, July, and August and perhaps a few weeks in September, we’ll call that 4 months. If in these four months we saved $26.08. Raw cost of materials (not necessarily what I paid for them, but these are the approximate market values) :
- Barrels: 6 @ $50 each = $300
- Jet Pump 1 @ $479 + GST = $502.95
- Pipe, connectors, filter, valves & fittings = ~$200
Total cost: $1002.95. Savings / year: $26.08. Years to pay back (Assuming it rains enough to keep the barrels full between waterings) : 38.5